Sunday, March 30, 2014

Creating a simple soft keyboard for Android

Preface
Being able to have your own customized keyboard could become very handy and it could be fun. It gives you flexibility and versatility while your are using different apps. Especially, if you are going to use apps in different languages. Although you could find third party keyboards, they might not meet your requirements or you can not trust them. The important issue regarding third party keyboards is security. Since all your input data are being processed by third party keyboard,  they can steal all your information such as passwords quite easily without your consent.

Scenario
We are going to develop a single language keyboard. That is a keyboard supporting only one language. Note that, there are lots of capabilities I'm not covering. Here, I'm just trying to pave the way. Take the liberty to extend and bring new features to the keyboard you need. You can use whatever language characters you like in your keyboard.

Solution
So lets get our hands dirty. I tried to put comments in the code and make it self-explanatory. If you want  to develop your keyboard all you need are the classes and files below.
  •  android.inputmethodservice.InputMethodService : 
Provides standard implementation of an inputService that can be a keyboard, a drawable area or an speech recognition. In our case I'm rendering it as soft keyboard. 
  •  android.inoutmethodservice.KeyboardView.OnKeyboardActionListener : 
Provides us with the capability to listen for keyboard events.

public class InputMethod extends InputMethodService implements
  KeyboardView.OnKeyboardActionListener {

 private Keyboard keyboard;
 private KeyboardView keyboardView;

//Initializes the interface
 @Override
 public void onInitializeInterface() {
  super.onInitializeInterface();
//XML description of our keyboard
  keyboard = new Keyboard(this, R.xml.language_keys);
 }

 @Override
 public View onCreateInputView() {
  keyboardView = (KeyboardView) getLayoutInflater().inflate(
    R.layout.language_input, null);
  keyboardView.setOnKeyboardActionListener(this);
  //Setting our keyboard on to this view
  keyboardView.setKeyboard(keyboard);
  return keyboardView;
 }

//Here is our key Listener. It will get called when user touches a key 
 @Override
 public void onKey(int primaryCode, int[] keyCodes) {
    
  /*
   * If you need to attach a debugger in your project you can 
   * wait for the debugger as below. Otherwise comment out the 
   * line below.
   */
  android.os.Debug.waitForDebugger(); 
  
   /* We are trying to make a sound and a little vibration
    * when user clicks on any keys. AUDIO_SERVICE AND VIBRATOR_SERVICE are 
    * constants defined in android.content.Context
    */
  AudioManager am = (AudioManager) getSystemService(AUDIO_SERVICE);
  Vibrator vb = (Vibrator) getSystemService(VIBRATOR_SERVICE);
  vb.vibrate(50);
  am.playSoundEffect(AudioManager.FX_KEY_CLICK, 0.5f);

  if (primaryCode == Keyboard.KEYCODE_DELETE) {
   handleDelete();
  } else {
   handleCharacter(primaryCode, keyCodes);
  }
 }

 private void handleDelete() {
  //Dispatching delete event to the currently focused view. 
   The view could be TextView or EditText
  getCurrentInputConnection().sendKeyEvent(
    new KeyEvent(KeyEvent.ACTION_DOWN, KeyEvent.KEYCODE_DEL));
 }

 private void handleCharacter(int primaryCode, int[] keyCodes) {
  InputConnection conn = getCurrentInputConnection();
  //Enters text to the currently active view (EditText).
    1 moves the cursor after the full text
  conn.commitText(String.valueOf((char) primaryCode), 1);
 }
//Rest of the code
}

  • R.xml.language_keys :
Defines the keyboard keys layout. As it is shown below you can see we have defined one row of our soft keyboard with only on key in it. Character "a". 97 is the decimal representation of character a. For the android:popupKeyboard="xml/popup_keys" read the definition of the next bullet point. You can have many rows and more than one key in a row. Here, only part of the file is shown. This file goes to xml folder of your project.

<Keyboard xmlns:android="http://schemas.android.com/apk/res/android"
    android:keyWidth="10%p"
    android:horizontalGap="0px"
    android:verticalGap="0px"
    android:keyHeight="50dip">

   <Row android:keyWidth="10%p">
        <Key android:codes="97" 
             android:keyLabel="&#97;"
             android:popupCharacters="&#65;" 
             android:popupKeyboard="@xml/popup_keys" />
   </Row>
</Keyboard>
  • popup_keys : 
 XML representation of the popup keyboard containing alternate keys. This representation has a default layout. The character defined in the previous section as android:popupCharacters will be shown in this keyboard.  This view will be shown to the user when he log press on a key having this popup  character defined. This file goes to xml folder of your project.

<Keyboard xmlns:android="http://schemas.android.com/apk/res/android"
    android:keyWidth="10%p"
    android:horizontalGap="0px"
    android:verticalGap="0px"
    android:keyHeight="50dp">
</Keyboard>

  • R.layout.language_input :
I could not find any better description as android documentation itself. "A view that renders a virtual Keyboard. It handles rendering of keys and detecting key presses and touch movements." This file goes to layout folder of your project.
<android.inputmethodservice.KeyboardView
        xmlns:android="http://schemas.android.com/apk/res/android"
        android:id="@+id/keyboard"
        android:layout_alignParentBottom="true"
        android:layout_width="match_parent"
        android:layout_height="wrap_content"
        />


  • method.xml : 
Defines metadata for the service. The content of this file could be as below. This file will be referenced in android manifest file with meta-data tag name android:name="android.view.im".

<input-method xmlns:android="http://schemas.android.com/apk/res/android">
    <subtype android:imesubtypelocale="en_US" 
                android:imesubtypemode="keyboard" 
                android:label="English">
    </subtype>
</input-method>
Sunday, May 26, 2013

Swipe with Tabs

Preface
Easy navigation and presentation are 2 main things that can make your software more user friendly.  To achieve this we can combine TabHost widget and ViewPager LayoutManager together.

Scenario
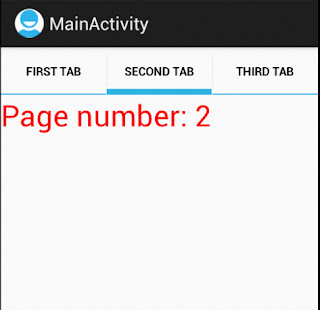
The UI is consist of 3 tabs and 3 pages. Selecting each tab will automatically swipe to the corresponding page in the ViewPager. The other way around,  swiping each page will result in the selection of the matching tab. Here I'm not going to discuss how to create tabs you can find so many tutorials on the net. The focus of this article is on how to use these 2 useful widgets together and how they can interact with each other.

swiped on page 2. Tab 2 is selected


Solution
Now, lets look at some code and see how we can implement the scenario. Here we have a MainActivity class. Apart from creating the necessary views and setting their properties in the overridden onCreate method pay attention to the 2 interfaces that this class has implemented. These are the listeners responsible to listening for the appropriate events that we are interested on. 

 public class MainActivity extends Activity implements OnTabChangeListener, OnPageChangeListener{  
      private TabHost host;  
      private ViewPager pager;  
   @Override  
   public void onCreate(Bundle savedInstanceState) {  
     super.onCreate(savedInstanceState);  
     setContentView(R.layout.activity_main);  
     host = (TabHost)findViewById(android.R.id.tabhost);  
     pager = (ViewPager) findViewById(R.id.pager);  
     
     host.setup();  
     TabSpec spec = host.newTabSpec("tab1");  
     spec.setContent(R.id.tab1);  
     spec.setIndicator("First tab");   
     host.addTab(spec);  
     
     spec = host.newTabSpec("tab2");  
     spec.setContent(R.id.tab2);  
     spec.setIndicator("Second tab");  
     host.addTab(spec);  
     
     spec = host.newTabSpec("tab3");  
     spec.setContent(R.id.tab3);  
     spec.setIndicator("Third tab");  
     host.addTab(spec);  
     
     pager.setAdapter(new MyPagerAdapter(this));  
     pager.setOnPageChangeListener(this);  
     host.setOnTabChangedListener(this);  
   }  
      @Override  
      public void onTabChanged(String tabId){  
           int pageNumber = 0;  
           if(tabId.equals("tab1")){  
                pageNumber = 0;  
           } else if(tabId.equals("tab2")){  
                pageNumber = 1;  
           } else{  
                pageNumber = 2;  
           }  
           pager.setCurrentItem(pageNumber);  
      }  
      @Override  
      public void onPageSelected(int pageNumber) {  
           host.setCurrentTab(pageNumber);  
      }  

If you select a tab or swipe a page you can get notified by these listeners methods.As you can see in the above snippet in each method we are instructing the other one to show the appropriate tab or page. For example, when a tab is selected the tag string we assigned to its TabSpec is passed to the onTabChanged method. By comparing the strings we can find out which tab was selected and accordingly set the corresponding page and instructing the pager to set its current item by setCurrentItem which accepts the page number.

The content of our view is read from the file below. If you take a look you can see that each TabSpec is constructed using a FrameLayout

 <?xml version="1.0" encoding="utf-8"?>  
 <TabHost xmlns:android="http://schemas.android.com/apk/res/android"  
   android:id="@android:id/tabhost"  
   android:layout_width="match_parent"  
   android:layout_height="match_parent" >  
   <LinearLayout  
     android:layout_width="match_parent"  
     android:layout_height="wrap_content"  
     android:orientation="vertical" >  
     <TabWidget  
       android:id="@android:id/tabs"  
       android:layout_width="match_parent"  
       android:layout_height="wrap_content" >  
     </TabWidget>  
     <FrameLayout  
       android:id="@android:id/tabcontent"  
       android:layout_width="match_parent"  
       android:layout_height="match_parent" >  
           <FrameLayout  
             android:id="@+id/tab1"  
             android:layout_width="match_parent"  
             android:layout_height="wrap_content"  
             android:visibility="gone" />  
           <FrameLayout  
             android:id="@+id/tab2"  
             android:layout_width="match_parent"  
             android:layout_height="wrap_content"  
             android:visibility="gone" />  
           <FrameLayout  
             android:id="@+id/tab3"  
             android:layout_width="match_parent"  
             android:layout_height="wrap_content"  
             android:visibility="gone" />  
     </FrameLayout>  
     <android.support.v4.view.ViewPager  
       xmlns:android="http://schemas.android.com/apk/res/android"  
       android:id="@+id/pager"  
       android:layout_width="match_parent"  
       android:layout_height="wrap_content"/>  
   </LinearLayout>  
 </TabHost>  

Finally, here is our PageAdapter feeding our ViewPager. for the sake of simplicity each page is consisted of only one TextView.

 public class MyPagerAdapter extends PagerAdapter {  
      private Context ctx;  
      public MyPagerAdapter(Context ctx){  
           this.ctx = ctx;  
      }  
      @Override  
      public Object instantiateItem(ViewGroup container, int position) {  
           TextView tView = new TextView(ctx);  
           position++;  
           tView.setText("Page number: " + position);  
           tView.setTextColor(Color.RED);  
           tView.setTextSize(20);  
           container.addView(tView);  
           return tView;  
      }  
      @Override  
      public int getCount() {  
           return 3;  
      }  
      @Override  
      public boolean isViewFromObject(View view, Object object) {  
           return (view == object);  
      }  
 }  

Friday, January 25, 2013

ViewPager, Fragment and one oversight

Scenario
There is a  fragment which inflates a view consisting of some UI widgets (few TextViews, Spinners and etc). A ViewPager will load multiple instances of this fragment with different data using FragmentPagerAdapter. As you can see in the first snippet below the data is received through an intent from another activity (first part in red). Then iterating over the data we are creating new fragments, passing as an argument the data we want to populate each fragment with (second part in red). For example, consider the data as a list of all tasks assigned to you by your manager. It consists of subject shown in a TextView, status of the task shown in a Spinner and whether its finalized or not shown with a CheckBox.

Problem
ViewPager loads first fragment with the help of  the assigned adapter. The data is loaded into the UI views, so far so good. Now, if we try to swipe to the next fragment we notice that the data either is not populated into the second fragment's UI or it is partially populated. 
public class MyActivity extends FragmentActivity {  
           @Override  
           public void onCreate(Bundle savedInstanceState) {  
                super.onCreate(savedInstanceState);  
                setContentView(R.layout.activity_my_layout);  
                ViewPager pager = (ViewPager) findViewById(R.id.dataPager);  
                List<MyData> dataList = (List<MyData>) getIntent()  
                          .getSerializableExtra("DATA");  
                List<Fragment> fragments = new ArrayList<Fragment>();  
                int i = 0;  
                if (dataList != null) {  
                     for (MyData data: dataList) {  
                          MyFragment myFragment = new MyFragment();  
                          Bundle args = new Bundle();  
                          args.putSerializable("MYDATA", data);  
                          myFragment.setArguments(args);  
                          fragments.add(myFragment);  
                     }  
                MyPagerAdapter adapter = new MyPagerAdapter(getSupportFragmentManager(), fragments);  
                pager.setAdapter(adapter);  
           }  
           private class MyPagerAdapter extends FragmentPagerAdapter {  
                private List<Fragment> myFrags;  
                public MyPagerAdapter(FragmentManager manager,  
                          List<Fragment> frags) {  
                     super(manager);  
                     this.myFrags = frags;  
                }  
                @Override  
                public Fragment getItem(int paramInt) {  
                     return myFrags.get(paramInt);  
                }  
                @Override  
                public int getCount() {  
                     return myFrags.size();  
                }  
           }  
      }  
 }  

Solution
In the onCreateView of the fragment we are inflating a view for our fragment's UI. The problem arises when we try to find our UI widgets from findViewById of the activity instead of the inflated view of the current fragment. You can clearly see this in the snippet below. In our example the code in green is the correct way of finding a view.

Public class MyFragment extends Fragment{
      . . .  
      private View rootView;  
      . . .  
      @Override  
      public View onCreateView(LayoutInflater inflater, ViewGroup container, Bundle savedInstanceState) {  
           rootView = inflater.inflate(R.layout.myLayout, container, false);   
           return rootView;  
      }  
      @Override  
      public void onActivityCreated(Bundle savedInstanceState) {  
           super.onActivityCreated(savedInstanceState);  
           . . .  
           ((TextView) getActivity().findViewById(R.id.my_Text_view))  
                               .setText("MY_TEXT");  
           ((TextView) rootView.findViewById(R.id.my_Text_view))  
                               .setText("MY_TEXT");  
           . . .  
      }   
           . . .  


Saturday, January 5, 2013

Event Bubbling and Event Capturing

Preface
Sometimes order of events becomes important. Different browsers behave differently. Precedence of events differs in browsers. Some might handle them in capturing phase and some in bubbling phase or both (W3C model). Precedence makes more sense when you have elements inside one another.

Scenario
We have a table with one cell. There is a combo-box in the cell. Suppose the requirement is to  reverse the order of handlers for onClick and see if we can stop event propagation.

For doing so you can make use of addEventListener method described in W3C Event Capture. This function accepts 3 arguments. Event, handler function and a boolean for capturing/bubbling. First of all we are registering handler when the page load is complete by using onload event.
By passing true to addEventListener we indicate that we are interested in capturing phase and if false
it means we are interested in bubbling phase.
Lets have an example. If you click on the combo, first any ancester is checked for an event handler. Since the capturing phase is set to true, tblBblClicked will be called then since there is no other handlers in capturing phase it will start the bubbling phase and calls comboBblClicked.
You can also turn off all the handlers in the capturing phase by setting both listeners to false.
...
 function comboBblClicked(){  
      alert("combo bbl is clicked");  
 }  
 function tblBblClicked(e){  
      alert("tbl bbl is clicked!");  
 }  
 function registerEventListeners(){  
      var tblBbl = document.getElementById('tblBbl');  
      var comboBbl = document.getElementById('cmbBbl');  
      tblBbl.addEventListener('click',tblBblClicked,true);  
      comboBbl.addEventListener('click',comboBblClicked,false);  
 }  
 </script>  
 </head>  
 <body onload="registerEventListeners();">    
 <table id="tblBbl" border="1" >  
      <tr>  
           <td>  
                <select id="cmbBbl" >  
                     <option value="opt1" >opt1</option>  
                </select>  
           </td>  
      </tr>  
 </table>  
...

Now if you want to stop the propagation of events in one of your event handlers you can make use of
e.stopPropagation() in the W3C model. "e" is the event passed to your handler function.

Tuesday, December 25, 2012

Storing objects in an Android UI View

Preface
Its really useful to relate data with UI presentation of that data. By doing this one can identify the data that needs to be operated upon. In Android we can store data in a View by using View's setTag().


Scenario
Consider you have a requirement to show a list of purchase policies for a product. In each row of that list we have a Checkbox and one TextView. CheckBox shows if the policy has been applied on the product or not and TextView shows the actual text of the policy. Now, when a user selects or deselects a CheckBox we want to refresh and recalculate the total price of that purchase. For this recalculation we must know which policy is selected or deselected.
We have to somehow associate some data about each policy to each CheckBox. By doing this we can find out which policy is selected.

Problem
Associating data with its UI representation.

Solution  
In our design we have incorporated a ListView . List's data is coming from an adapter. In the getView of that adapter we are associating an object to each CheckBox. If you look at our inflated layout "purchase_policy_list_row" in onClick of our checBox we have a method to be invoked. When the method in called we can cast the passed View and retrieve our corresponding data.

Lets look at a sample code below. Here we also used view holder pattern. This is for making Listview's more efficient You can find more about it on the web.  Please notice the line in red. There we are creating a DTO object and setting it to a CheckBox. In our case we are keeping and Id and a type in our DTO.

 public class PurchasePolicyListAdapter extends BaseAdapter {  
      ...  
      @Override  
      public View getView(int position, View convertView, ViewGroup parent) {  
           View view = null;  
           //View holder pattern  
           if (convertView == null) {  
                LayoutInflater inflater = (LayoutInflater) context  
                          .getSystemService(Context.LAYOUT_INFLATER_SERVICE);  
                view = inflater.inflate(R.purchase_policy_list_row, parent, false);  
                ViewHolder holder = new ViewHolder();  
                holder.policyPr = (CheckBox) view.findViewById(R.id.policyPr);  
                holder.policyTitle = (TextView) view.findViewById(R.id.policyTitle);  
                view.setTag(holder);  
           } else{  
                view = convertView;  
           }  
           ((ViewHolder) view.getTag()).policyPr.setTag(createTagObject(position));  
           ViewHolder holder = (ViewHolder) view.getTag();  
           holder.policyTitle.setText(policies.get(position).getPolicyText());  
           return view;  
      }  
      private PolicyDTO createTagObject(int position) {  
           PolicyDTO dto = new PolicyDTO(policies.get(position).getType(), policies.get(position).getPurchasePolicy().getId());  
           return dto;  
      }  
      //Class for view holder pattern  
      static class ViewHolder {  
           public CheckBox policyPr;  
           public TextView policyTitle;  
      }  
 }  

In R.purchase.order_policy_list_row, the CheckBox has android:onClick="policySelected" . This will trigger policySelected() in the PurchaseActivity class (Android will do this call automatically). When the method is called we are casting the given View to a CheckBox. Then retrieving our DTO by getTag() method.

 public class PurchaseActivity extends Activity{  
           ...  
           public void policySelected(View view){  
                final CheckBox policyInt = (CheckBox) view;  
                DialogInterface.OnClickListener dialogClickListener = new DialogInterface.OnClickListener() {  
                     @Override  
                     public void onClick(DialogInterface dialog, int which) {  
                          switch (which){  
                          case DialogInterface.BUTTON_POSITIVE:  
                               ...  
                               if(policyInt.isChecked()){  
                                    ...  
                                    PolicyDTO dto = (PolicyDTO)policyInt.getTag();  
                                    ...  
                               }  
                               ...  
                               break;  
                          case DialogInterface.BUTTON_NEGATIVE:  
                               ...  
                               break;  
                          }  
                     }  
                };  
                DialogInterface.OnCancelListener cancelListener = new DialogInterface.OnCancelListener(){  
                     @Override  
                     public void onCancel(DialogInterface dialog) {  
                          ...  
                     }  
                };  
                AlertDialog.Builder builder = new AlertDialog.Builder(this);  
                AlertDialog dialog = builder.setMessage(R.string.message).setPositiveButton(R.string.confirm, dialogClickListener)  
                          .setNegativeButton(R.string.cancel, dialogClickListener)  
                          .setCustomTitle(R.string.title)  
                          .setOnCancelListener(cancelListener)  
                          .show();  
           }  
           ...  
 }  

Here we are showing a dialog to a user with positive and negative buttons. You can skip this dialog part and focus only on the red lines of code. As you can see if the user clicks on the positive button then we are retrieving the attached PolicyDTO. In the negative button you can just cancel the user operation. You might notice that we have a CancelListener as well. This is because if user decides to cancel or move away from the dialog is as if he decides to negate the operation.

Sunday, October 28, 2012

Android Service test - callback method not firing

Preface
If you want to execute a long running operation in your program Service is a fine choice. You might ask why not using AsyncTask? The answer to it is simple. AsyncTask is for short operations (few seconds probably) and Service is for longer or more CPU intensive jobs. For better and easier integration, it’s better to test each unit of your program. Android JUnit provides set of classes for writing unit tests. ServiceTestCase is a class by which you can unit test your service class.

Scenario
Consider we have to send some data for a complex calculation to a remote server and wait for the response. We decided to use Service. In our example when user initiates the calculation our service start in the background and send the data to the server. Once the result is back it will update the application local database. Lets have a unit test for our Service.

Problem
Our service is an IntentService and it receives a serviceCallback (ResultReciever). The problem is, before the callback method (onReceiveResult) is called the teardown method of the our unit test terminates the test.

Solution
A solution to this problem could be somehow forcing the main thread to wait for the result of the callBack service method to return. For doing this we can make use of CountDownLatch. This class helps us to pause the thread until one or more operations finishes. Below is the ServiceTestCase utilizing the aforementioned mechanism.

await method of CountDownLatch cause the current thread to wait. When the response is back,  countDown method of CountDownLatch counts down and releases all the waiting threads.


 import java.util.HashMap;  
 import java.util.Map;  
 import java.util.Properties;  
 import java.util.concurrent.CountDownLatch;  
 import android.content.Intent;  
 import android.os.Bundle;  
 import android.os.ResultReceiver;  
 import android.test.ServiceTestCase;  
 public class CalculationServiceTest extends ServiceTestCase<CalculationService>{  
      public CalculationServiceTest() {  
           super(CalculationService.class);  
      }  
      public void testCalculation() throws InterruptedException{  
           //our synchronization aid   
           CountDownLatch signal = new CountDownLatch(1);  
           //passing object for evaluating the result of our service  
           Map<String, String> result = new HashMap<String, String>();  
           //Creating a new thread which is responsible for running our Service  
           new Thread(new WorkerRunnable( signal, result)).start();  
           //casuing the current to wait  
           signal.await();  
           assertEquals(CommunicationConstants.SERVICE_RESULT_SUCCESS, (String)result.get("result"));  
      }  
      class WorkerRunnable implements Runnable {  
           private  CountDownLatch doneSignal;  
           private Map<String, String> result;  
           public WorkerRunnable(CountDownLatch cdl, Map<String, String> result){  
                this.doneSignal = cdl;  
                this.result = result;  
           }  
           @Override  
           public void run() {  
                Intent startServiceIntent = new Intent();  
                startServiceIntent.putExtra(CalculationService.SERVICE_TYPE,  
                          Constant.CALCULATE);  
                ResultReceiver serviceCallback = new ResultReceiver(null) {  
                     @Override  
                     protected void onReceiveResult(int resultCode, Bundle resultData) {  
                          result.put("result", String.valueOf(resultCode));  
                          doneSignal.countDown();  
                     }  
                };  
                //setting a callback for our service  
                startServiceIntent.putExtra(CalculationService.SERVICE_CALLBACK,  
                          serviceCallback);  
                startServiceIntent.setClass(getContext(), CalculationService.class);  
                startService(startServiceIntent);  
           }  
      }  
 }  

Friday, October 19, 2012

Drag & Drop & resize using Ext JS

Preface
If HTML is the structure of a website and CSS its facade which give the look and feel, JavaScript is a vibrant life of it. Incorporating JavaScript is a daunting task and brings whole lots of new difficulties such as cross browser compatibility. Using a framework can mitigate the challenges, provide a mechanism that handles this issue seamlessly and make it much easier to develop and maintain UI reach websites.

Scenario

We want to have the capability of drag and drop in our web page. Suppose we are a photo printing company. A user have uploaded few photos to our website. We show the thumbnail of the uploaded photos on the left side of our page. User can drag and drop thumbnails of the photos they want to have printed to the selectedPanel on the right side of the page. Then, they can resize the each to a bigger size. We distinguish between resize and drag & drop by single and double clicking of the mouse over the desired image thumbnail (div).

Topics covered in this tutorial:
  • Drag & drop
  • Resizer
  • Overriding
  • Dynamically adding/removing CSS classes
  • Iterating an array
  • Distinguishing between single click & double click
  • Query DOM nodes by selectors
Requirement
 Ext JS version 4.1 (This example is using 4.1. You can use other versions but some classes might have changed)

I'm not going to cover the basics of how to incorporate Ext JS. You can have a look at getting started guide and learn the basics and setup.

Consider the snippet below as our photo selection page. All the photos are in pics div and user can drag and drop them to the selectedPics div.
 <html>  
 <head>  
 <link href="ext-all.css" rel="stylesheet" type="text/css">  
 <style type="text/css">  
 .pic {  
   width: 55px;  
   height: 50px;  
   border: 1px solid;  
 }  
 .panel {  
   position: absolute;  
   top: 100px;  
   left: 100px;  
   width: 100px;  
   height: 500px;  
   border: 1px solid;  
 }  
 .selectedPanel {  
   position: absolute;  
   top: 100px;  
   left: 400px;  
   width: 500px;  
   height: 500px;  
   border: 1px solid;  
 }  
 .dropZoneOver {  
   background-color: #99FF99;  
 }  
 .dragStyle {  
   outline: red solid thin;  
 }  
 </style>  
 </head>  
 <body>  
   <div id="pics" class="panel">  
     <div id="pic1" class="pic">Pic1</div>  
     <div id="pic2" class="pic">Pic2</div>  
   </div>  
   <div id="selectedPics" class="selectedPanel"></div>  
 </body>  
 </html>  

Now lets discuss the javascript little bit. You can take a look at the comments in our snippet below for some insight.  In the onReady we are registering event listeners for click and dblClick on all the pic divs (each photo is wrapped in a div). We are differentiating between single click and double click by setting a flag and using a timeout. This distinction is recognized in the fireClickEvent. Before applying either drag and drop or resize  to the thumbnails (divs). We use destroy() method to clean and remove all listeners and destroy the passed object before creating new type of object. By doing these we make sure user's previous operation (either drag and drop or resize) is now canceled, all classes are gone and everything is clean and ready for new operation. 
Resize method gives the resize capability to the received id. Move method give drag and drop capability to all the thumbnails in the pics div. Move method enable drag and drop to the all thumbnails (html div) in the pics div.

For resizing we are using Ext.resizer.Resizer.
For drag and drop we are using Ext.dd.DDProxy.

The code below goes to the head section of our HTML page.

 <script type="text/javascript" src="ext-all-dev.js"></script>  
 <script type="text/javascript">  
   var dragProducts = new Array();  
   var dropTarget;  
   var resizer;  
   var dblClickFlag = false;    
   var clickFlag = true;
   //onReady ensures that all the scripts are loaded then it executes its function  
   Ext.onReady(function(){  
     dragIndex = 0;
     //Add event handler to the element  
     Ext.get('pic1').on('click',function(evt, el, o){  
       startSingleClick(el.id);  
     });  
     Ext.get('pic1').on('dblclick',function(evt, el, o){  
       startDblClick(el.id);  
     });  
     Ext.get('pic2').on('click',function(evt, el, o){  
       startSingleClick(el.id);  
     });  
     Ext.get('pic2').on('dblclick',function(evt, el, o){  
       startDblClick(el.id);  
     });  
   });  
   function startSingleClick(cmpId){  
     clickFlag = true;  
     setTimeout(function() { fireClickEvent(cmpId) }, 500);  
   }  
   function startDblClick(){  
     dblClickFlag = true;  
   }     
   function fireClickEvent(cmpId){  
     if (clickFlag){  
       clickFlag = false;  
       if (dblClickFlag){  
         startResize(cmpId);  
       } else{  
         startMove(cmpId);  
       }  
     }  
     dblClickFlag = false;   
   }      
   function destroy(){  
     if(resizer){  
       Ext.destroy(resizer);  
       resizer = null;  
     }  
     Ext.destroy(dropTarget);    
     Ext.Array.each(dragProducts, function(dragProduct) {  
         Ext.destroy(dragProduct);    
     });  
     dragProducts = new Array();  
   }  
   function resize(cmpId){  
     destroy();  
     var elem = Ext.get(cmpId);  
     var elWidth = elem.getWidth();  
     var elHeight = elem.getHeight();  
     resizer = Ext.create('Ext.resizer.Resizer', {  
       width: elWidth,  
       height: elHeight,  
       el: elem,  
       handles: 'all',  
       pinned: true,  
       dynamic: true    
     });  
   }  
   function move(){  
     var overrides = {  
       onDragEnter : function(evtObj, targetElId) {  
         var targetEl = Ext.get(targetElId);  
         targetEl.addCls('dropZoneOver');  
       },  
       onDragOut : function(evtObj, targetElId) {  
         var targetEl = Ext.get(targetElId);    
         targetEl.removeCls('dropZoneOver');  
       },  
       onDragDrop : function(evtObj, targetElId) {  
         var dragEl = Ext.get(this.getEl());  
         dragEl.removeCls('dragStyle');  
         var dropEl = Ext.get(targetElId);  
          if (dragEl.dom.parentNode.id != targetElId) {  
           dropEl.appendChild(dragEl);  
           this.onDragOut(evtObj, targetElId);  
         }  
       },  
       b4StartDrag : function(x, y) {  
         //Shows a frame while dragging the item  
         this.showFrame(x, y);  
         var dragEl = Ext.get(this.getEl());  
         //adds red border to the dragging item   
         dragEl.addCls('dragStyle');  
       },  
       onInvalidDrop : function() {  
         //indicates an invalid drop. Only related dragDrop objects are valid targets  
         this.invalidDrop = true;  
       },  
       endDrag : function() {  
         //The delete operator removes a property from an object.  
         delete this.invalidDrop;  
       }  
     }  
     destroy();  
     //Query DOM tree for all the elements containing the class "pic"   
     var pics = Ext.query("*[class*=pic]");  
     //Iterate over an array  
     Ext.Array.each(pics, function(pic){  
       dragProducts[dragIndex] = new Ext.dd.DDProxy(pic, 'pic', {  
         isTarget : false  
       });  
       //Apply the overrided functions to the DDProxy class  
       Ext.apply(dragProducts[dragIndex], overrides);  
       dragIndex++;  
     });  
     var sp = Ext.get('selectedPics');  
     //Create valid drop target  
     dropTarget = new Ext.dd.DDTarget(sp, 'pic');  
     }  
   function startResize(cmpId){  
     resize(cmpId);  
   }  
   function startMove(){  
     move();  
   }            
 </script>  

For the details of each class and its properties used in this tutorial please look at  Ext JS documentation. They have a well documented API.